The Options section, under Catalog, lets you customize what details
the customer sees when checking out a product. On the product page, the
“Available Options” section is displayed under the price. The option for
that product must be selected before the customer can add the product
to the shopping cart.
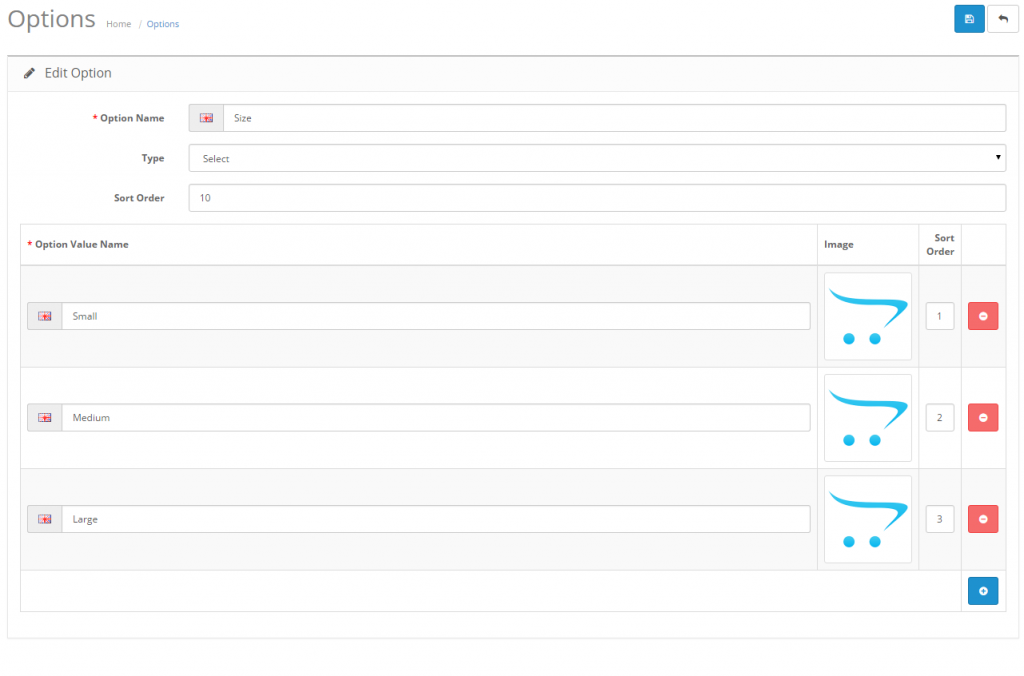
The image below displays the default options, but you can choose to
edit or delete any of them. Essentially, the options can be created to
fit whatever added specifications are needed for the customer to
purchase the product. The “Insert” button will direct you towards
creating a new option.

For example, if you wanted the customer to choose a size for a
particular product before checking out, you can create a “Size” option.
The “Type” dropbox will show a variety of ways to display this option:
- Choose: Select”, Radio, Checkbox, Image”
- Input: Text”, Textarea
- File: File”
- Date: Date”, Time”, Date & Time”

For the “size” option, three option value’s were created : “Small”,
“Medium”, and “Large”. Images could be added for the option, but since
it is referring to size the option value name will suffice. If the
option was “Color”, having images of the color would be appropriate.
Adding options to products
To apply the options to a specific product, you will need to edit the Option tab
under Catalog > Products. Options could to be created prior to
adding a product, then added during product creation in the Options tab.
Options in the store front
With the general concept behind “Options” explained above, we can now
go into a detailed example of using the Option section to alter the
checkout experience in the store front. For this example, we will be
adding Options to the iPod Classic product example provided from
installation.
The image below was taken from our iPod Classic product page. We can
see that product details such as manufacturer, product code,
availability, and price are given product details next to the product
image. The only interactive option seen below is the “Qty”, or quantity.
In the space provided next to quantity, the customer can alter the
amount of iPod classics to be added to the shopping cart.

For the purpose of this example, we want to add more options to
customize the type of iPod Classic that will be purchased by the
customer. Under Catalog > Options we will insert new options with
varying option values. OpenCart allows for four different types of
options for customers to select under Options: Choose, File, Date, and Input.
Choose type
The “Choose” Type lets the customer select specific option values. Among these choose types are the following sub-types:
- Select: Provides a drop down box where the customer must select an option value.
- Radio: Select-able icons with the option values.
Only one radio selection can be made; clicking another selection will
deselect the previously clicked option and move it to the current
selection. - Checkbox: Multiple option values can be checked at once.
- Image: Gives a radio selection next to small uploaded images.
In our stock we have different colors of classic iPods: black,
silver, and white. The Option Name to describe these colors will be
“Color”. We decided that we want to use a radio type option to display
the color options. We want this option to be the first option in the
list, so we gave it a sort order of 1. We added 3 option value names for
our colors: Black, White, Silver. If we wanted to, we could have
uploaded an image of the iPods in their different colors next to their
respective value names using the Image manager.

Next we will move to the Options tab
to add our option to a product under Catalog > Products. This
section is different than the Options section under Catalog because it
will directly assign a previously created option to a product. We
clicked the green ‘+’ icon and typed in Color to bring up our “Color”
option that we made under Catalog > Options. In the Option Value
column, we added 3 values to enable the Black, Silver, and White option
values to be displayed. In addition, we added the quantity of each color
available, selected “yes” to subtract stock, and added 10 points to the
Reward Points. We could add an increase or decrease in price for select
colors, or indicate the weight, but we chose not to.

Saving this Color option under the Options tab will automatically change
how this product is viewed on it’s product page. The product page can
be seen in the screenshot below. Already, we discover that a new section
has been added under price named “Available Options”. We see our Color
Option with the three colors in a radio selection format. The red
asterick means that this option must be selected before adding it to the
cart. If a selection isn’t made, the customer cannot add the product to
the Shopping Cart.
